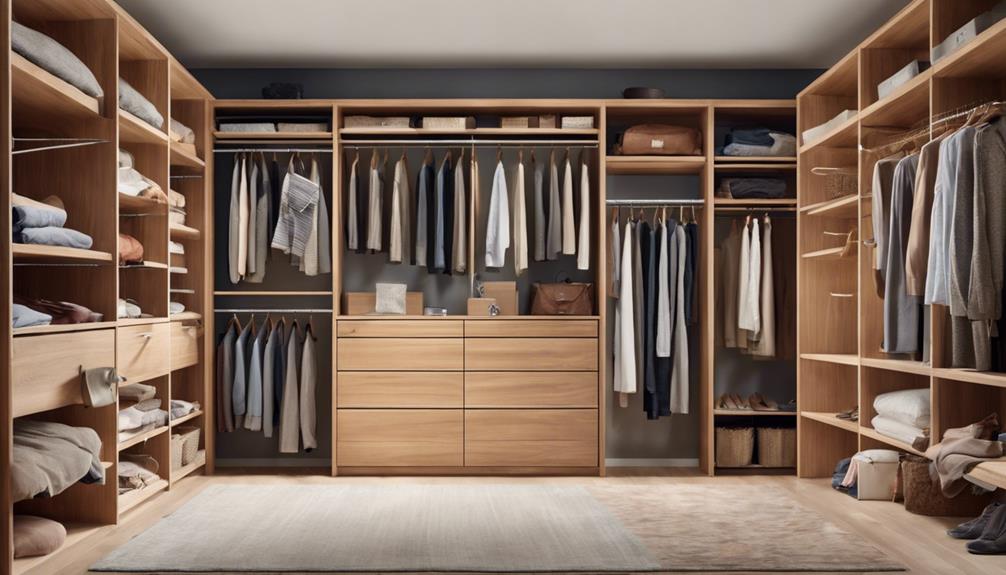
You're about to create a custom closet organizer that's tailored to your unique space and style. Start by evaluating your closet's dimensions, considering obstacles like plumbing and windows. Then, envision a design and layout that incorporates hidden spaces and separate zones for different items. Take precise measurements, mark the walls, and build the frame using vertical panels and wall anchors. As you add shelves, rods, and accessories, think about load capacity, customization, and personalized touches. With a solid plan in place, you'll be on your way to a serene and functional closet that sparks joy – and there's more to discover to make it a reality.
Assessing Your Closet Space
Measure your closet's dimensions, taking into account any obstacles like plumbing, electrical outlets, or windows, to determine the maximum usable space for your custom organizer. This vital step helps you create a functional and efficient closet that caters to your specific needs. As you assess your closet space, consider the principles of Closet Psychology, which suggests that a well-organized closet can positively impact your mental state and daily routine. By maximizing your closet's potential, you'll feel more in control and focused.
When measuring your closet, don't forget to account for any hidden spaces that can be utilized for storage. Consider installing shelves, drawers, or cabinets that can be tucked away, providing ample Hidden Storage for items you don't use frequently. This clever use of space will help maintain a clutter-free environment, making it easier to find what you need when you need it.
As you evaluate your closet's dimensions, think about how you can create separate zones for different types of items, such as a section for long-hang garments, a shelf for folded items, and a designated area for accessories. By doing so, you'll create a harmonious and functional space that reflects your personal style and meets your unique needs. By taking the time to carefully assess your closet space, you'll be well on your way to creating a custom organizer that serves you and your lifestyle.
Choosing a Design and Layout
With your closet's dimensions and hidden spaces in mind, you can now start envisioning a design and layout that suits your needs and style. This is where the fun begins! It's time to let your creativity shine and explore different design options. You can find Style Inspiration online, in magazines, or by visiting showrooms to get a sense of what you like and dislike.
When it comes to Space Planning, consider the items you'll be storing and how you'll access them. Think about the flow of your closet and how you'll move around it. Will you need a sitting area for trying on shoes? Do you prefer shelves, drawers, or a combination of both? Make a list of your must-haves and nice-to-haves to help guide your design decisions.
As you start sketching out your design, keep in mind the type of storage you need. Will you require double rods for extra hanging space or shelves for baskets and bins? Consider the height and depth of your shelves, as well as the type of hardware and finishes that fit your style.
Measuring and Marking the Walls
Your closet's unique dimensions and obstacles demand accurate measurements to guarantee a seamless installation of your custom organizer. To verify a perfect fit, take precise measurements of the closet's width, length, and any obstacles like windows, doors, or plumbing fixtures. Record these measurements in a notebook or on a design app to reference later.
Next, identify the wall type (drywall, plaster, or concrete) to determine the type of wall anchors needed. This will assure your custom organizer is securely fastened to the wall, preventing it from tipping or falling. Take note of any electrical outlets, switches, or other features that may affect the installation.
Using a level and a pencil, mark the wall where you want to install the organizer's components, such as shelves and rods. Start by marking the spot where the top shelf will sit, then work your way down to the floor. Use a stud finder to locate the wall studs, which will provide a secure anchor point for your wall anchors.
Remember to double-check your measurements and markings to avoid mistakes. This attention to detail will save you time and frustration during the installation process. By taking the time to accurately measure and mark your walls, you'll set yourself up for success and guarantee a beautiful, functional custom closet organizer that meets your needs.
Building the Frame and Shelves
You'll begin building the frame and shelves by cutting the vertical panels to the required height, using a miter saw or circular saw to make precise cuts. Choose frame materials that fit your design, such as MDF, plywood, or solid wood. Guarantee the panels are level and secure them to the wall using wall anchors. This will provide a sturdy base for your shelves.
Next, decide on the shelf styles that suit your needs, considering factors like depth, width, and material. You can opt for adjustable shelves or fixed ones, depending on your storage requirements. For corner units, use specialized brackets to maximize space and create a seamless look.
Once you've assembled the frame, start building the shelves. You can choose from various frame designs, such as a simple rectangular frame or a more intricate design. Add shelf dividers to separate items and maintain organization. Use wall anchors to secure the shelves to the frame, ensuring stability and preventing wobbling.
Remember to measure twice and cut once to avoid errors. Take your time, and don't be afraid to ask for help if needed. With patience and attention to detail, you'll create a sturdy and functional frame and shelves for your custom closet organizer.
Adding Drawers and Accessories
Now that you've built a sturdy frame and shelves, add functional drawers and accessories to enhance your custom closet organizer's storage capabilities. This is where you can get creative and tailor your closet to your specific needs. Consider adding drawers with stylish Drawer Handles that complement your closet's design. These drawers can be used to store clothing, accessories, or even linens.
Accessory Trays can be attached to the shelves or walls to store small items like jewelry, watches, or sunglasses. For the fashion-conscious, consider installing Jewelry Organizers with individual compartments to keep valuable pieces organized and easy to find.
If you have the space, a Closet Bench can be a game-changer. Not only does it provide a comfortable spot to sit while getting dressed, but it can also include storage compartments underneath the cushion. This is perfect for storing shoes, bags, or out-of-season clothing.
Installing Shelving and Rods
You're now ready to tackle the most functional aspects of your custom closet organizer: shelving and rods. As you start installing these essential components, you'll need to ponder how you'll configure your shelves, strategically place rods, and incorporate customization ideas to maximize your closet's storage potential. By making intentional decisions in these areas, you'll create a space that's both stylish and functional.
Shelf Configuration Options
When designing your custom closet organizer, selecting the right shelf configuration is essential to maximizing storage and functionality. You'll want to contemplate the types of items you'll be storing and how often you'll need to access them. Adjustable heights are a great option, as they allow you to tailor the shelf spacing to fit your specific needs. This is particularly useful if you have items of varying sizes, such as large storage bins and smaller baskets.
Open shelving is another popular choice, providing easy access to your belongings while keeping them visible. This can be especially helpful for frequently worn items, like clothes and accessories. You can also use open shelving to create a sense of openness and airiness in your closet. When choosing an open shelving configuration, ponder the depth and width of your shelves, as well as the material and finish. By selecting the right shelf configuration, you'll be able to create a functional and organized space that meets your unique needs.
Rod Placement Strategies
As you've optimized your shelf configuration, it's time to strategically place rods to maximize your closet's hanging capacity, keeping in mind the types of garments you'll be storing and how frequently you'll need to access them. When deciding on rod placement, consider load capacity considerations to guarantee your rods can support the weight of your garments. Installing double rods can be beneficial, as they increase hanging space and allow for better organization. However, don't be afraid to think outside the box and explore angle alternatives, such as installing rods at a 45-degree angle to create a sense of depth and add visual interest to your closet. If you want to create a sleek, modern look, consider hidden rod systems, which can be recessed into the wall or concealed behind a panel. By thoughtfully planning your rod placement, you'll be able to create a functional and aesthetically pleasing closet space that meets your specific needs.
Customization Ideas
With your rod placement strategy in place, it's time to bring your custom closet to life by incorporating shelving and rods that reflect your personal style and storage needs.
Now, it's time to think about customization ideas that will make your closet truly unique. Consider incorporating personalized lighting to illuminate your space. This can include LED strips, pendant lights, or even a chandelier. Additionally, think about the color scheme you want to use. Will you go for a calming neutral tone or a bold, bright hue?
Here are some customization ideas to get you started:
| Customization Option | Description |
|---|---|
| Double Rods | Increase hanging space and maximize storage |
| Shelves with Baskets | Add storage for folded items and keep them hidden from view |
| Glass Shelves | Add a touch of elegance and make the most of vertical space |
| Crown Molding | Add a decorative touch and create a polished look |
Final Touches and Organization
You're now ready to add the finishing touches to your custom closet organizer, incorporating clever storage solutions and a logical layout that makes the most of your space. This is where you get to add the final flourishes that'll make your closet a haven of organization and style.
When it comes to closet decor, consider adding a few personal touches that reflect your personal style. A statement piece of artwork, a few favorite accessories, or even a fun rug can elevate the space and make it feel more inviting. Don't forget to incorporate some practical storage hacks, like bins, baskets, or shelves, to keep clutter at bay.
One clever storage hack is to install shelves with built-in drawers or cabinets, which can help keep items like socks and underwear organized. Another idea is to use stackable bins or baskets to store items like sweaters or jeans. By incorporating these clever storage solutions, you'll be able to keep your closet tidy and functional, making it easier to find what you need in a hurry.
Frequently Asked Questions
Can I Build a Custom Closet Organizer on a Budget?
You're wondering if you can build a custom closet organizer on a budget. The good news is, yes, you can! With some creativity and resourcefulness, you can create a functional and stylish space without breaking the bank. Consider DIY alternatives like repurposing old furniture or using affordable materials. By getting crafty and flexible with your budget constraints, you'll be amazed at what you can achieve.
How Do I Ensure My Closet Design Is Functional and Stylish?
When designing your closet, you'll want to make sure it's both functional and stylish. Start by considering your personal style, lifestyle needs, and fashion considerations. Achieve aesthetic balance by incorporating design principles, such as symmetry and contrast. Don't forget space planning to maximize closet flow. Choose a color scheme that reflects your personality, and prioritize your needs to create a harmonious space that serves you.
Can I Reuse Existing Closet Shelves and Components?
"When life gives you lemons, make lemonade" – and when you're left with existing closet shelves, get creative! You can definitely breathe new life into them. Consider shelf repurposing to give your closet a fresh spin. Component refinishing can also do wonders, updating the look without breaking the bank. By revitalizing what you already have, you'll not only reduce waste but also create a space that's both functional and stylish, serving you and your loved ones perfectly.
Are Custom Closet Organizers Suitable for Small Closets?
You're wondering if custom closet organizers are suitable for small closets. The answer is yes! Even with space constraints, a well-designed custom organizer can maximize your closet's potential. Consider your closet's dimensions and prioritize the items you need to store. With a little creativity, you can create a functional and efficient space that makes the most of every inch.
Can I DIY a Custom Closet Organizer Without Professional Help?
'You're a superhero if you think you can tackle a DIY custom closet organizer without professional help! But seriously, with time constraints, varying skill levels, and personal preferences, it's important to assess your DIY motivation. If you're driven to create a tailored space that reflects your style, go for it! However, if you're short on time or unsure about your skills, consider seeking guidance to avoid a stressful, costly, or poorly executed project.'